How to Create a Membership Area in Clickfunnels - Step-by-Step Guide
Want to launch your own membership site in Clickfunnels—without the overwhelm? Discover exactly how to create a membership area in Clickfunnels, from setup to content to access management. And to make it even easier, grab a free DFY membership area template to get started fast!

Do you want to create a membership area in Clickfunnels but not sure where to start? You're in the right place!
This beginner-friendly guide will walk you through all the steps for creating a membership area in Clickfunnels (formerly Clickfunnels 2.0). If you follow the steps in this article, you'll have a fully functional membership area that you can confidently share with your audience.
If you want to skip the heavy lifting, you can grab our done-for-you membership area framework here instead of building everything yourself!
It’s free when you create your Clickfunnels account using our special link, which also gives you an extended 30-day Clickfunnels trial instead of the usual 14 days, – and it comes with everything you need: a pre-built membership area, a sales funnel if you want to charge for access, a product setup, and a full tutorial to guide you through it.
You can watch a detailed video tutorial on how to get it done or follow the step-by-step guide below.
Now let’s see how to build a membership area in Clickfunnels if you decide to do it on your own!
Step 1: Add the Courses app to your dashboard
To start building our membership area, in the new version of Clickfunnels (formerly known as Clickfunnels 2.0), we'll need to use a feature called Courses.
If you used Clickfunnels Classic, you may know that there it was called Membership Area. The name may have changed, but the functionality is essentially the same—with some useful new features.
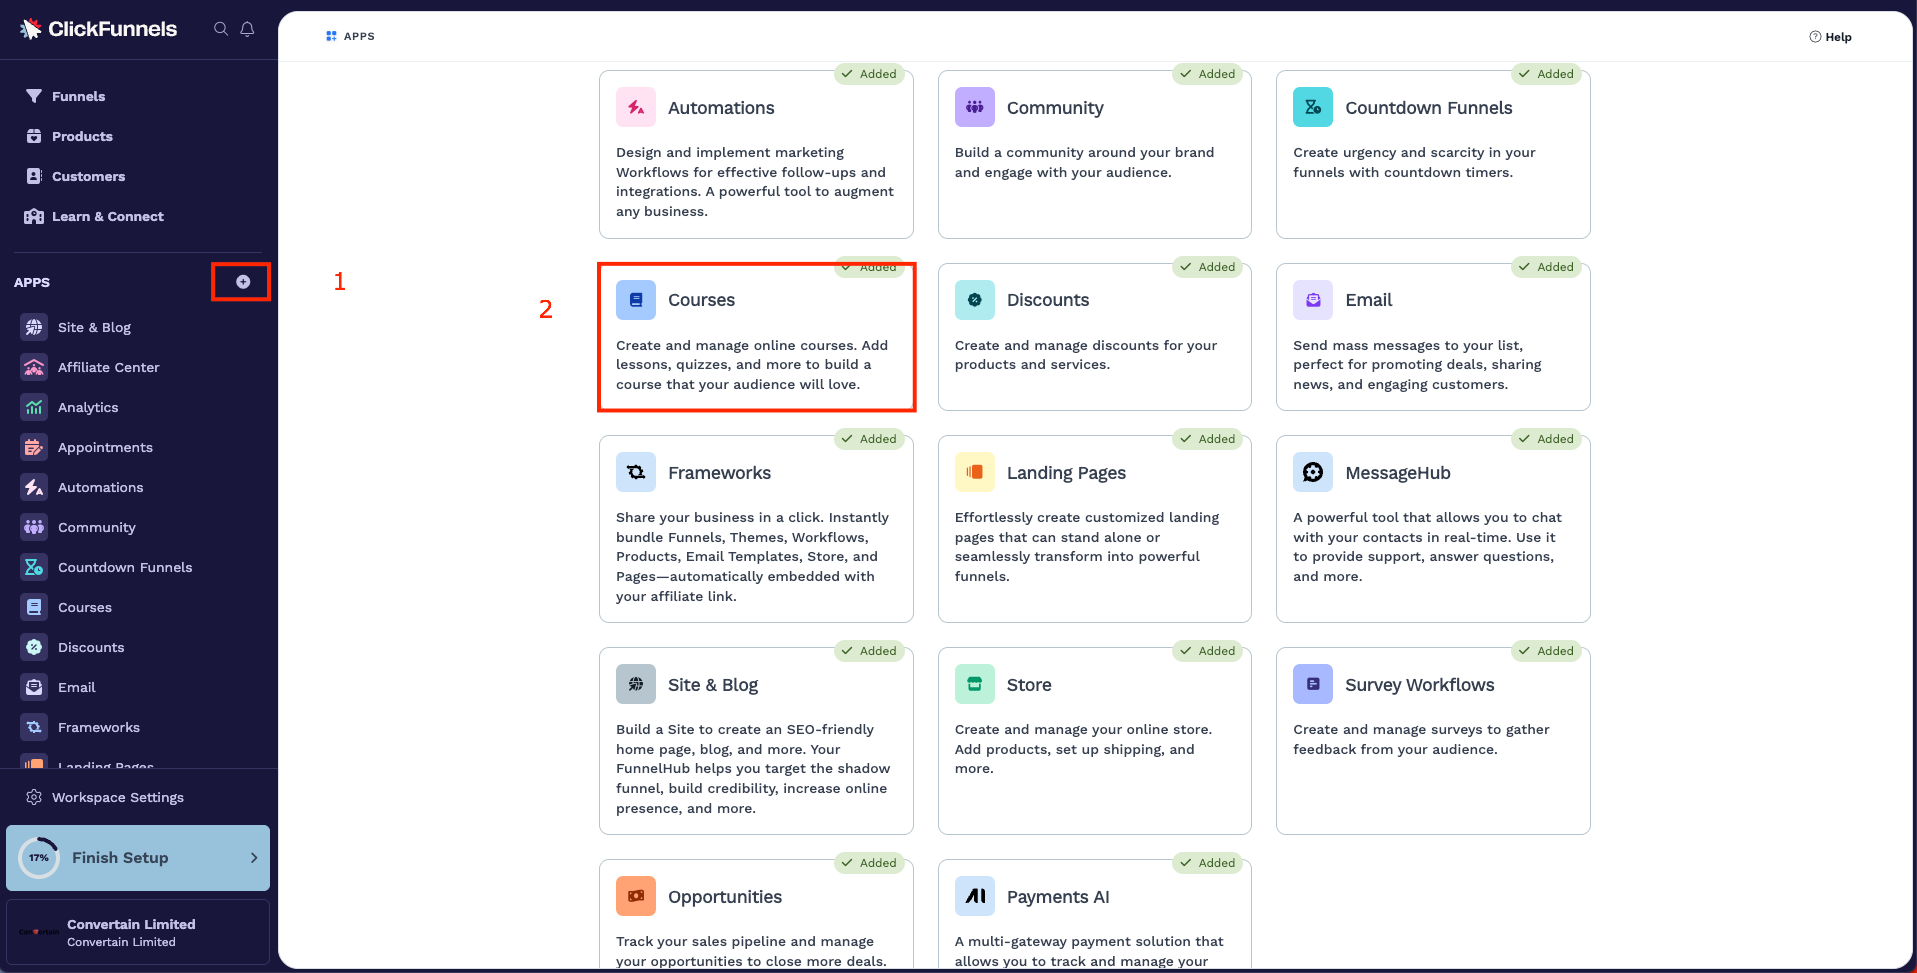
- To get started, make sure the Courses app is added to your dashboard.
- If you don’t see it in the sidebar, click the plus icon to add new apps, then search for Courses. Once you locate it, click on the card, and then click Add App to add this feature to your dashboard.
Step 2: Create a membership area in Clickfunnels
- Open the Courses section and click Create Course to start setting up your membership area. Clickfunnels will guide you through a short setup process.
- Choose the structure you’d like to use. You can select a simple course (think membership area), a drip course (where content unlocks gradually), or a custom course if you want more control. After making your selection, click Next Step.
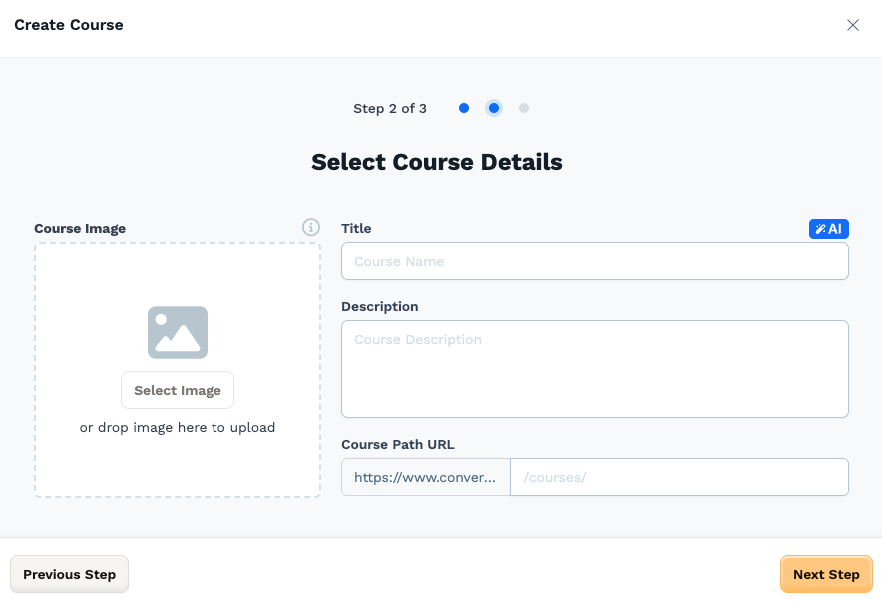
- Enter a title for your membership area. You can also add a description and upload a course image. These are optional and can be updated later, so don’t worry if you don’t have them ready right away. When you’re done, click Next Step to finalize the creation of your course.
Now your membership area has been created and you’ll be taken to the dashboard where you can start customizing it.
Step 3: Adjust the membership area settings
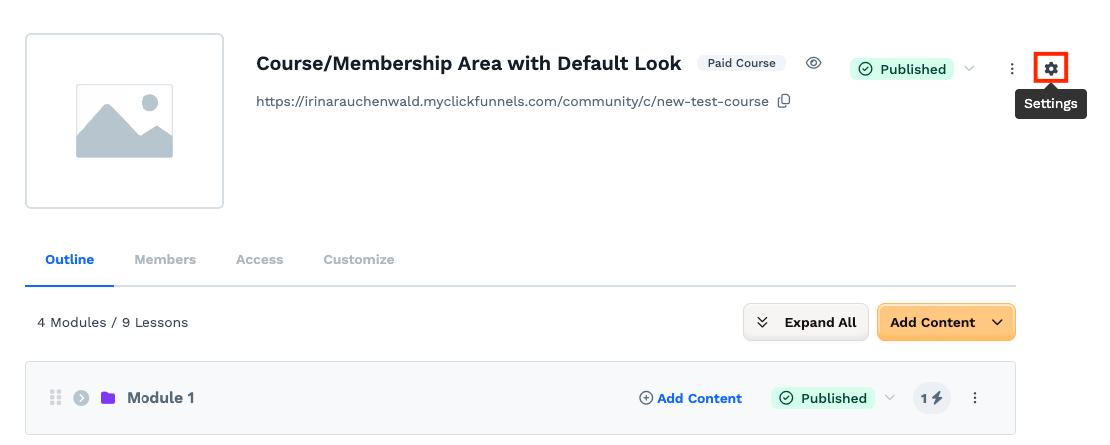
- Click the gear icon to open the course settings. Here, you can update the course title, description, image, URL, and theme, enable the automatic enrollment email, completion certificate, get a share link, and so on.
- Scroll through the available settings and make sure everything reflects how you want your membership area to appear in your customer center. For example, you can choose whether the it should be visible to non-members, whether to enable comments, and to issue completion certificates.
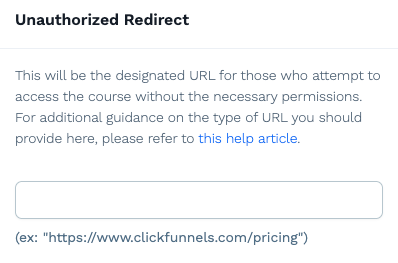
- You should also decide what happens if someone without access goes to your membership area course link. You can set a custom redirect page for these users, such as an opt-in or sales page.
- Once you've configured the settings for your membership site in Clickfunnels, click Update to save the changes.
Step 4: Create the structure for your membership area in Clickfunnels
Now you can start creating an outline for your membership area in Clickfunnels. Although the content blocks are called "modules" and "lessons" to align with the course structure, you can think of them as sections within your membership area.
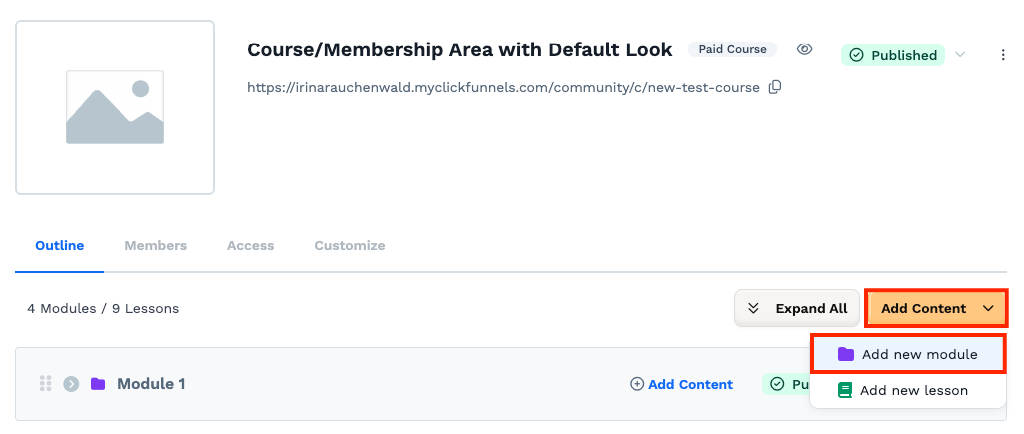
- Go to the Outline tab to start building the structure of your membership area in Clickfunnels.
- Click Add Content > Add New Module to create the first section. Give it a title, add a description and an image, if applicable, and click Create module.
While Clickfunnels calls these “modules,” you can name them however you like. You don’t need to use Module 1, Module 2, etc. Instead, you can use descriptive titles for your content sections like Welcome, Facebook Ads, or Sales Funnel Training. You can also add a module description and an image before clicking “Create Module.”
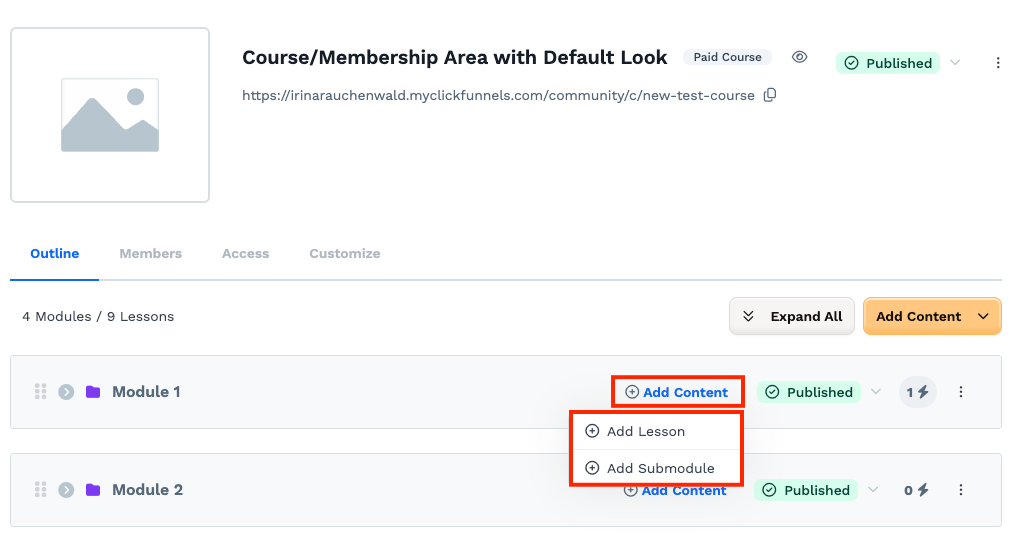
- After your module is created, you can add a sub-module or a lesson to it. Click Add Content, and then select Add Lesson or Add Submodule.
Enter a title for the lesson/submodule and select to which module it belongs (you can always change it later).
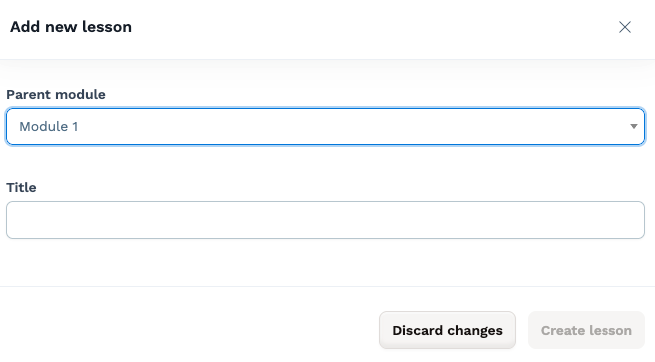
Again, you don’t have to label lessons numerically. Just use a clear title that describes what the lesson covers.
You can continue adding more modules and lessons as needed. If you want to reuse a structure, you can duplicate a module, rename it, and update its content.
Step 5: Add content to your membership site in Clickfunnels
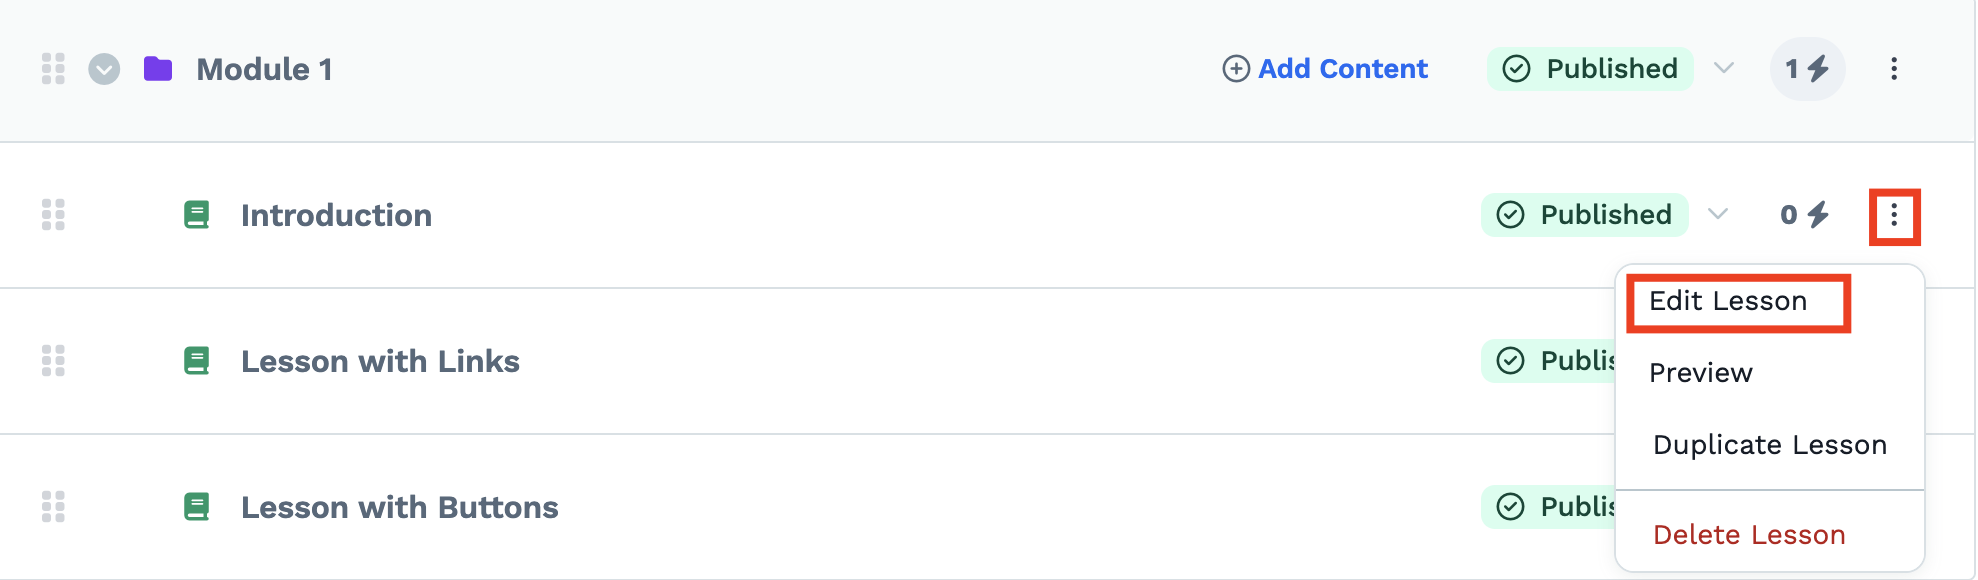
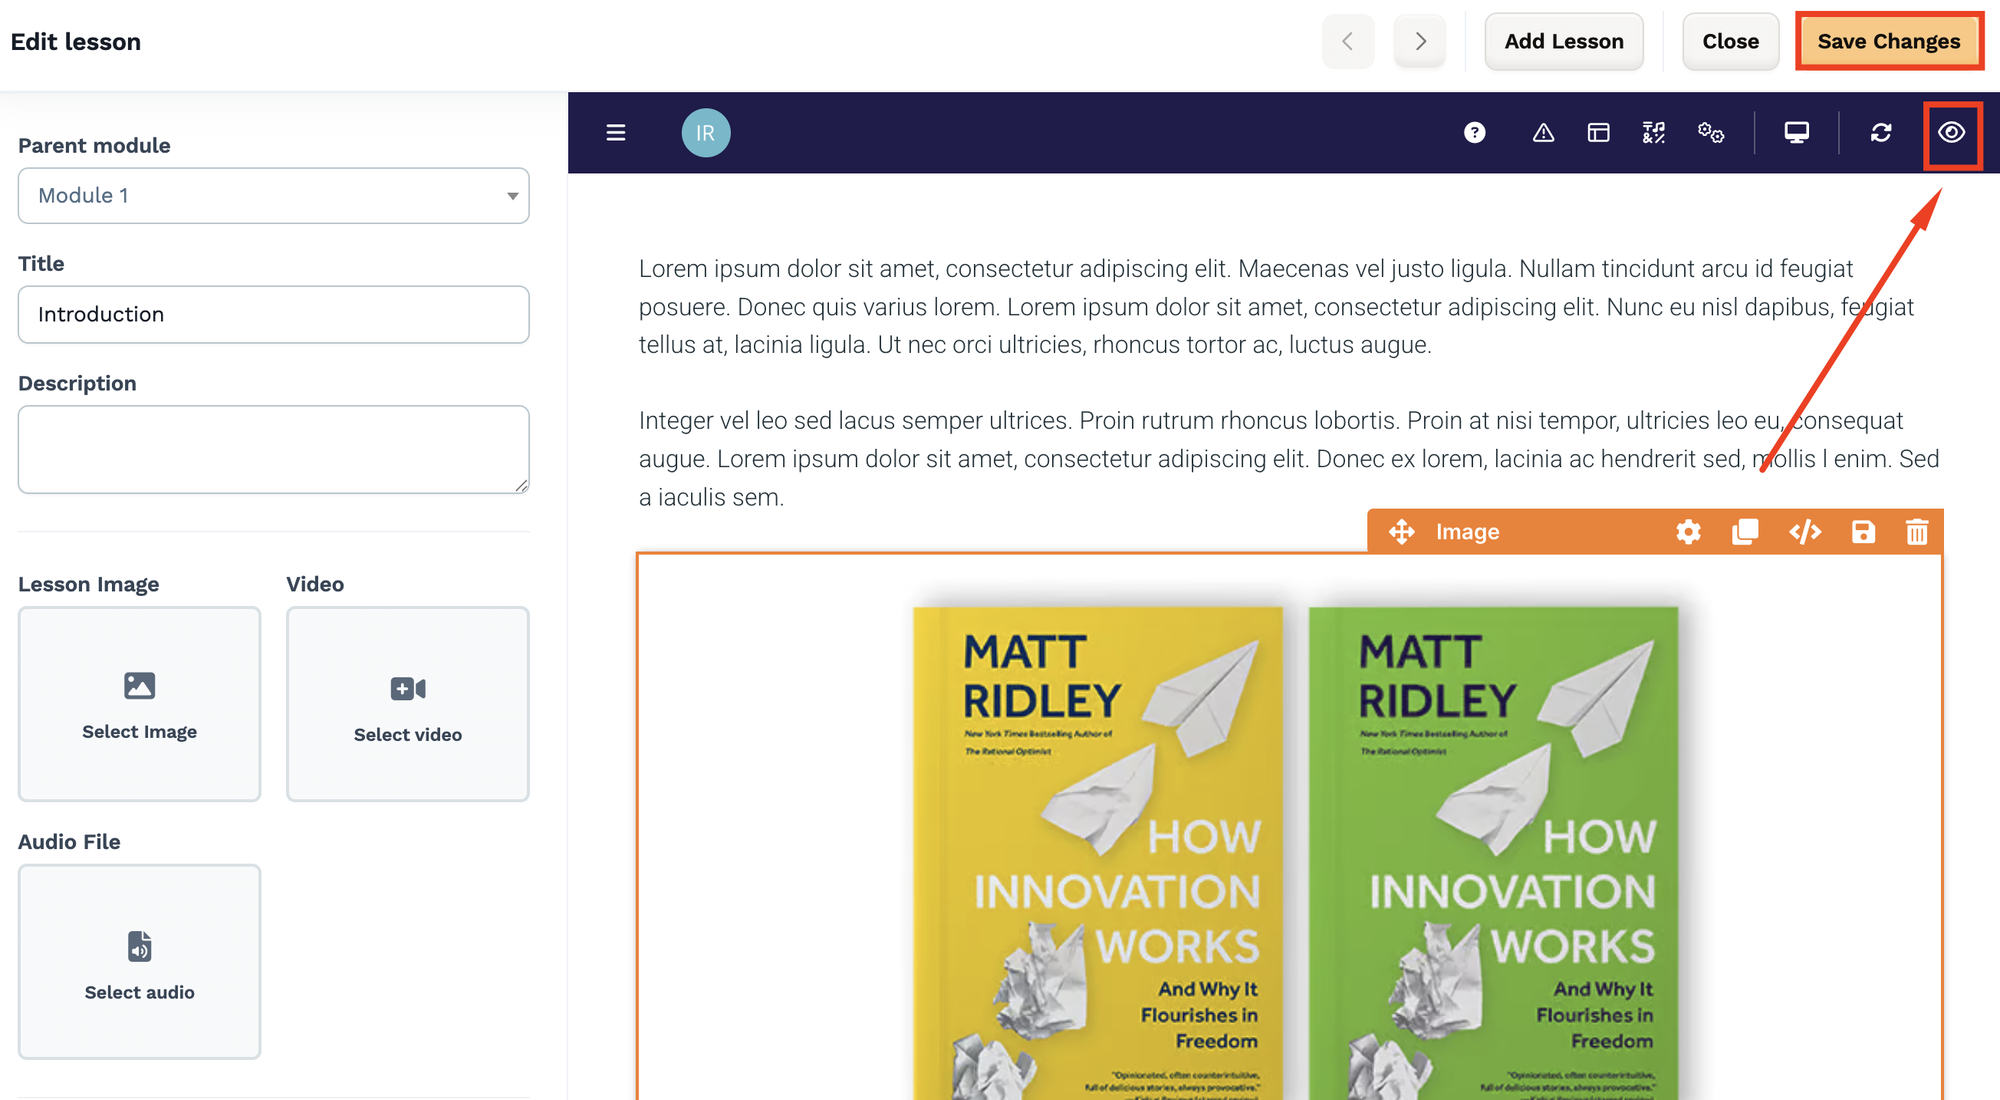
- To add content to a lesson, open the lesson in the editor. You can do it by clicking on the lesson name or the icon with three dots and selecting Edit Lesson.
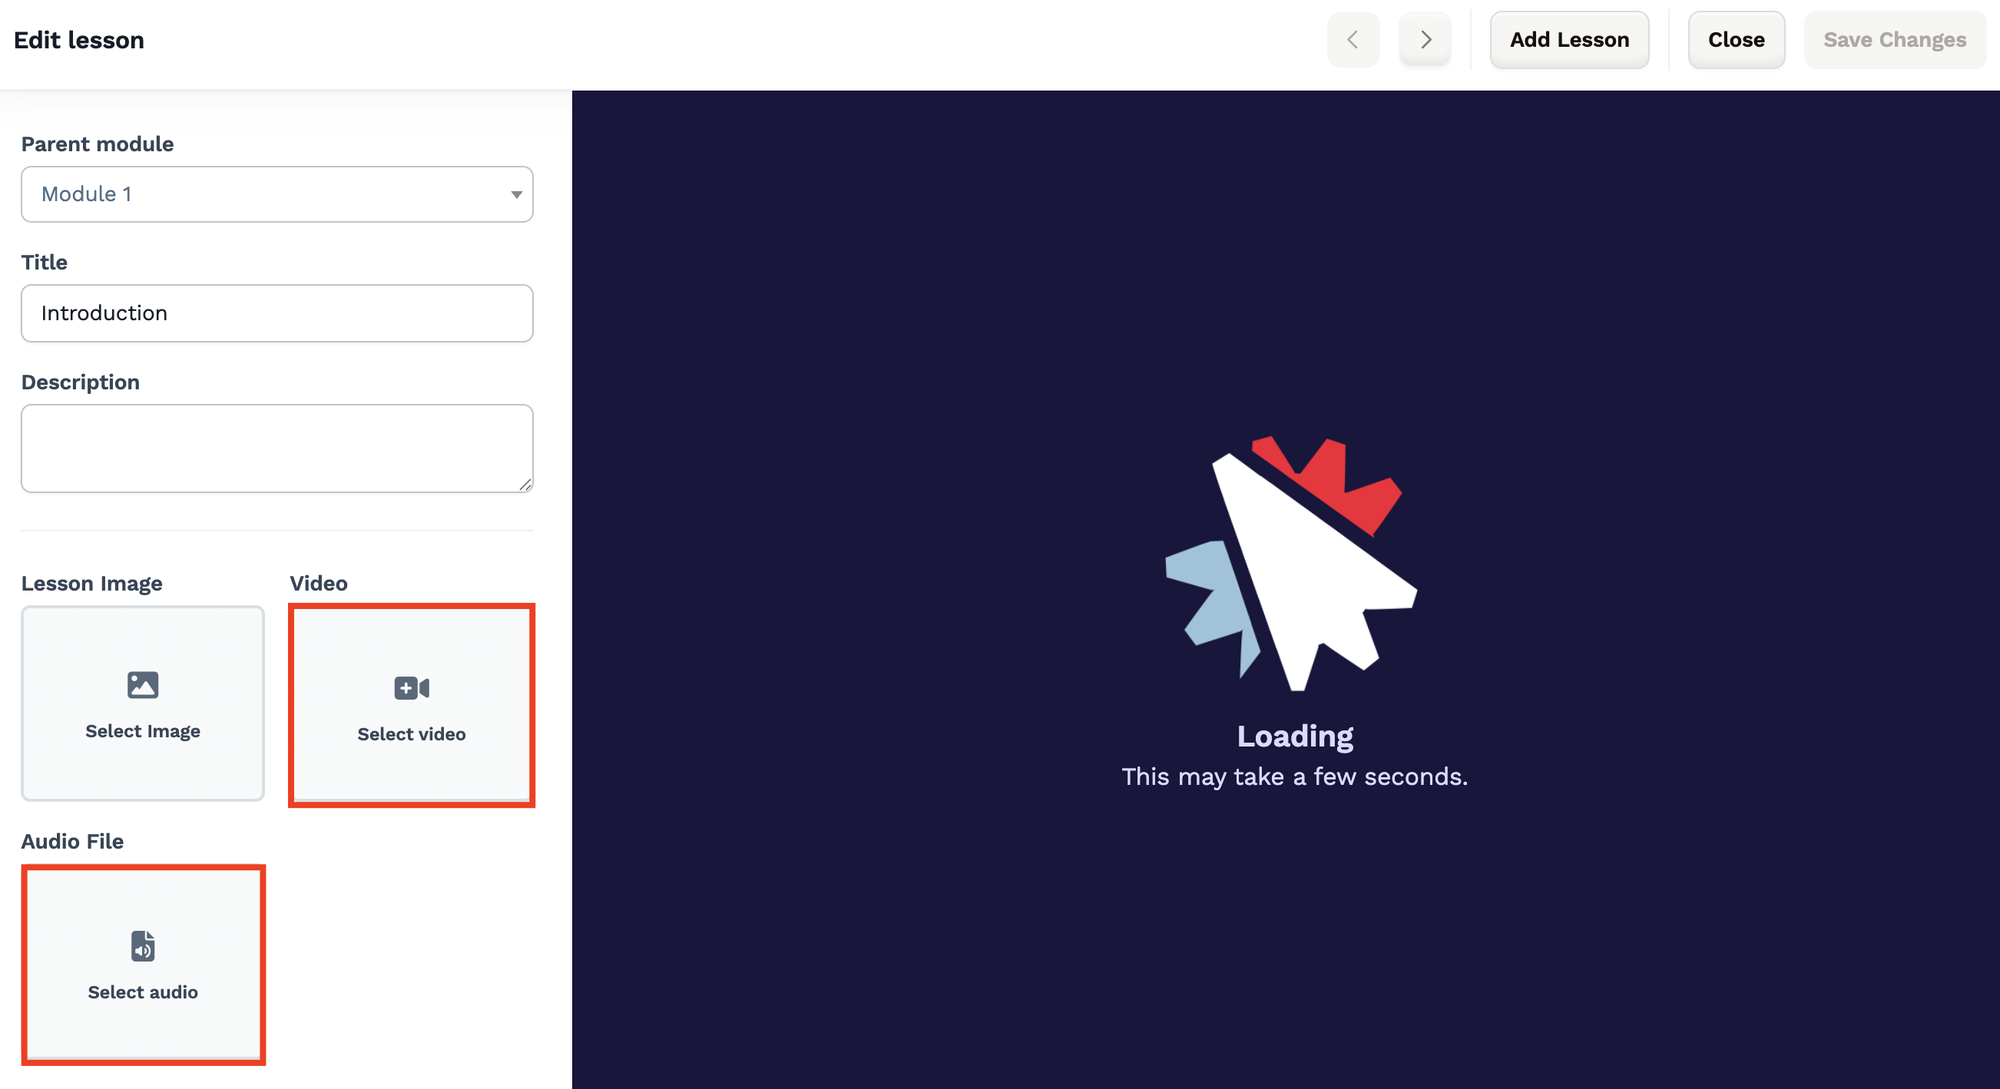
In the lesson editor, you’ll see two main areas: the settings on the left and the content editor on the right.
In the lesson settings, you can upload a video or audio file. These files are hosted directly in Clickfunnels, and they’ll automatically appear at the top of the lesson page.
- To upload a lesson video or audio, click the Select video or Select audio card to select a video or audio from your library or upload a new file from your device.
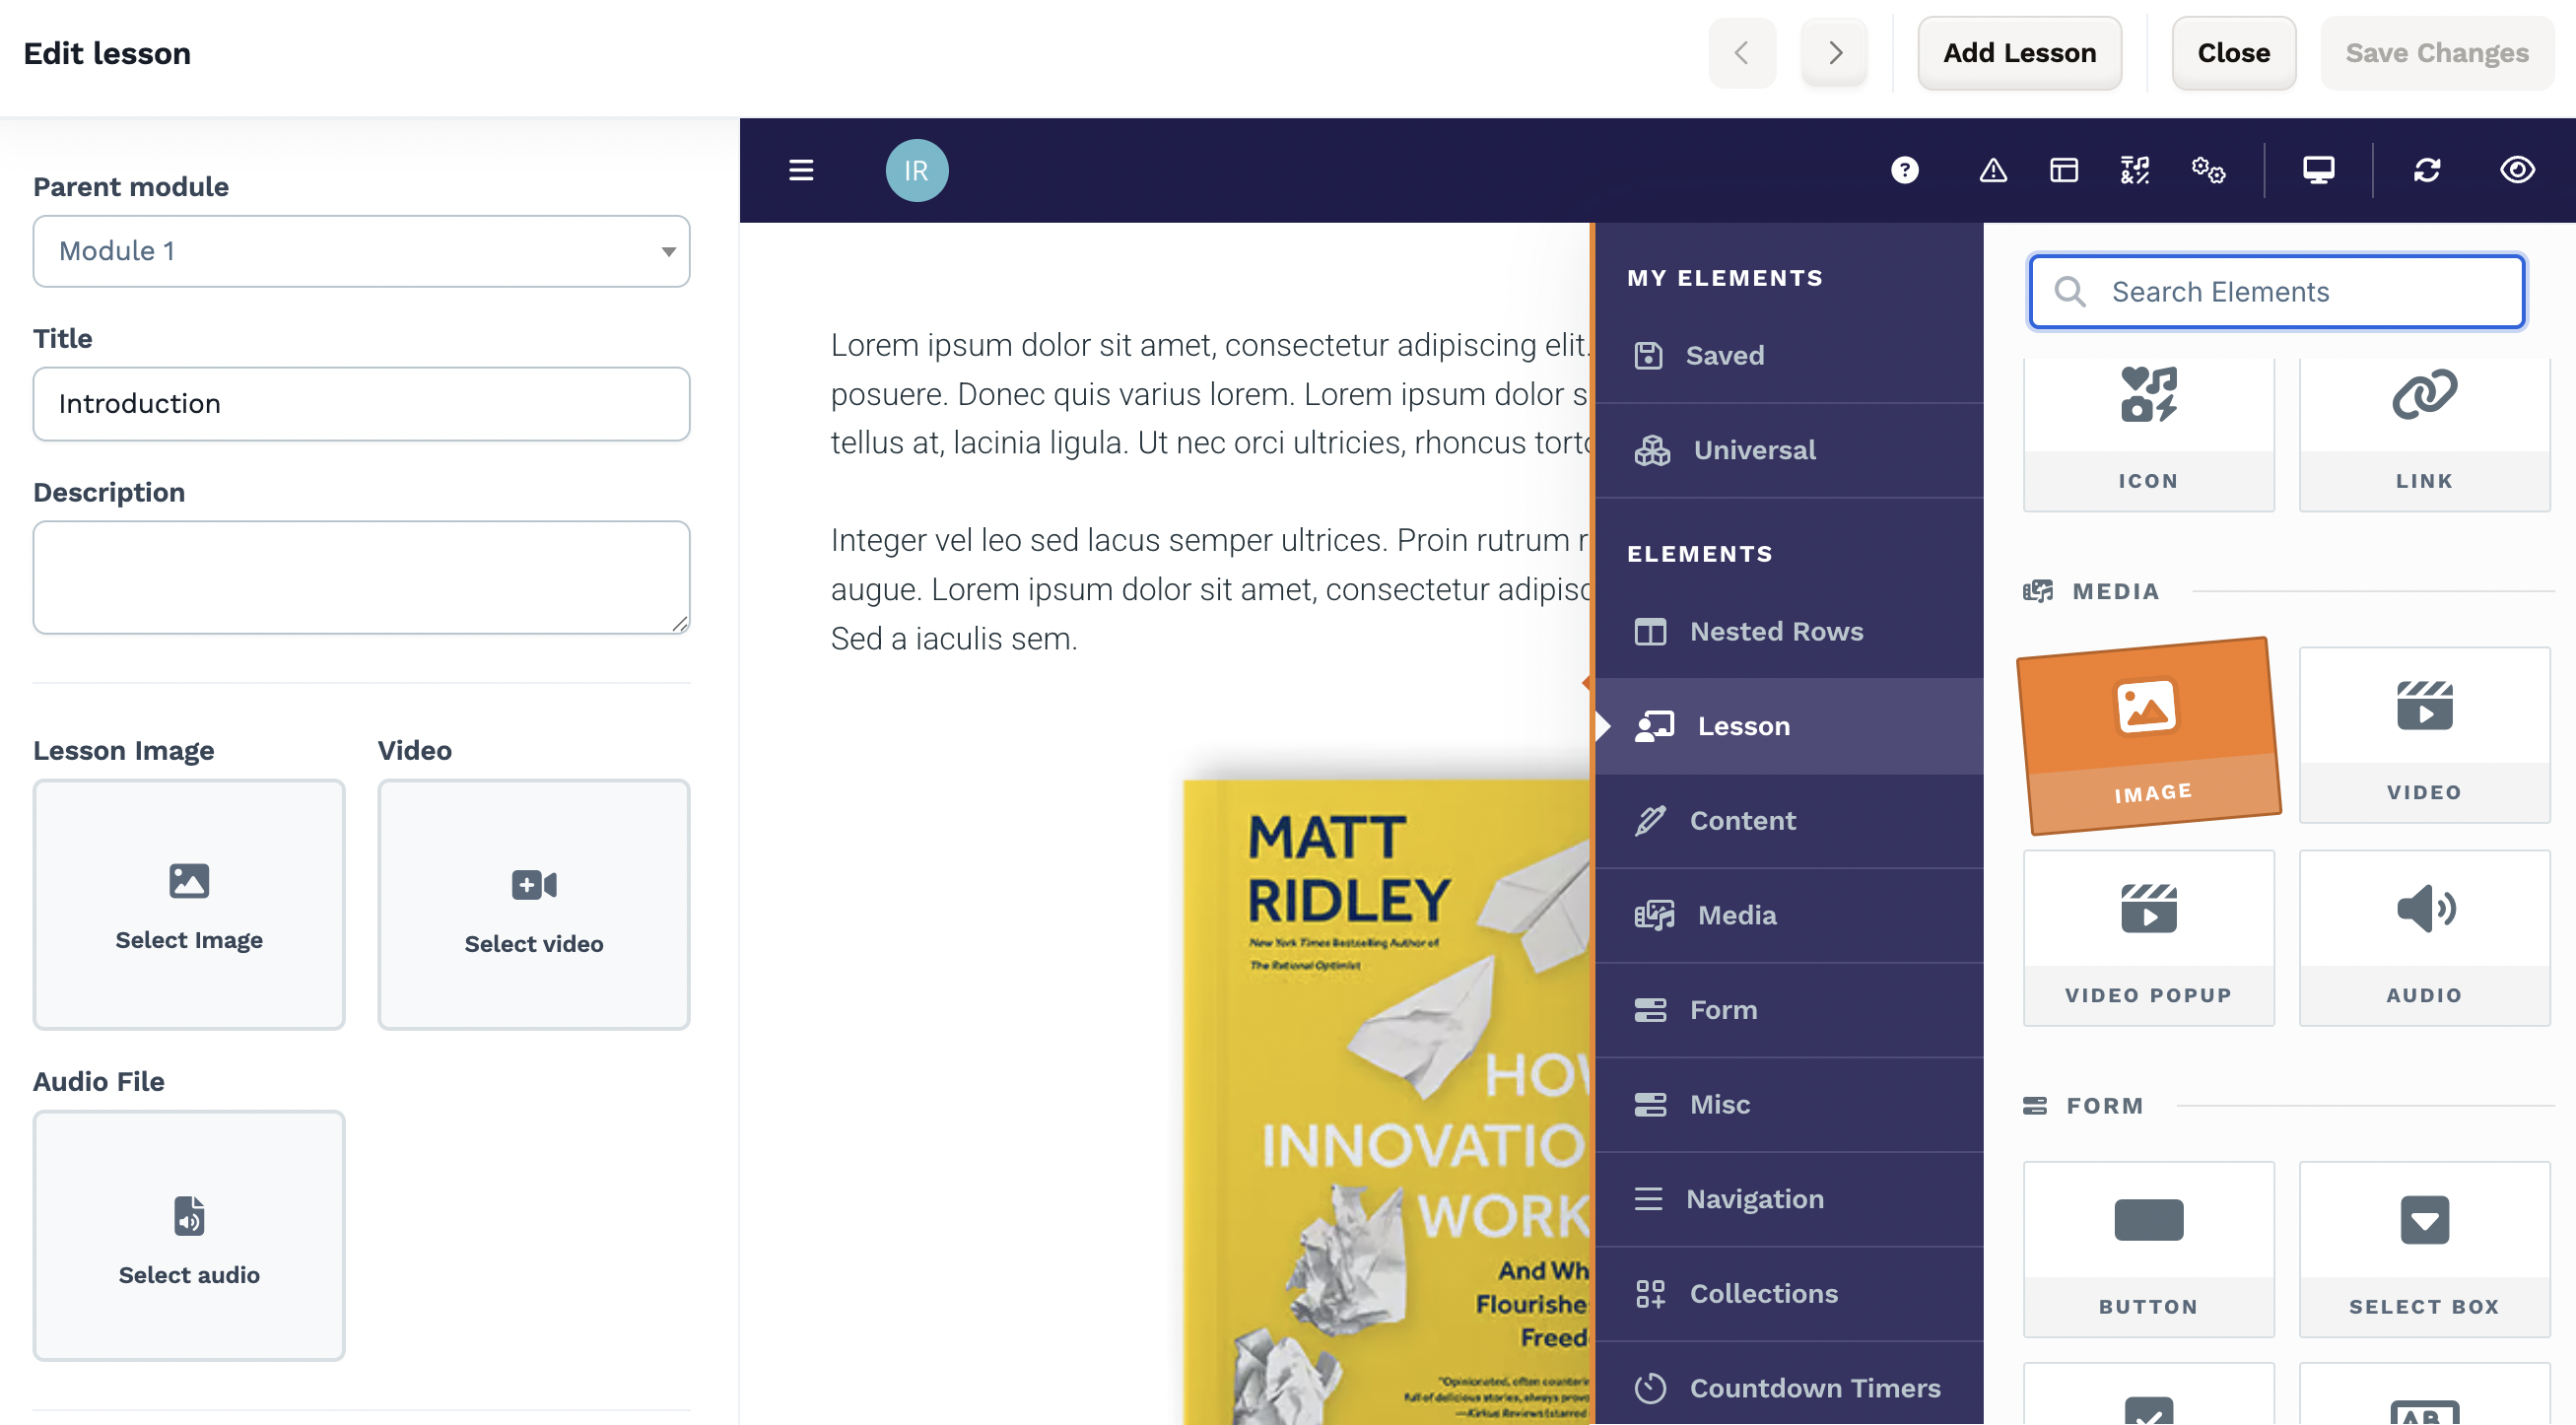
- To add other content elements to your lesson, like text, lists, images, or more videos, use the editor section on the right. Start by adding a new section, a row with one or more columns. Then search for an element you want to add and drag it into the editor area. Edit the element.
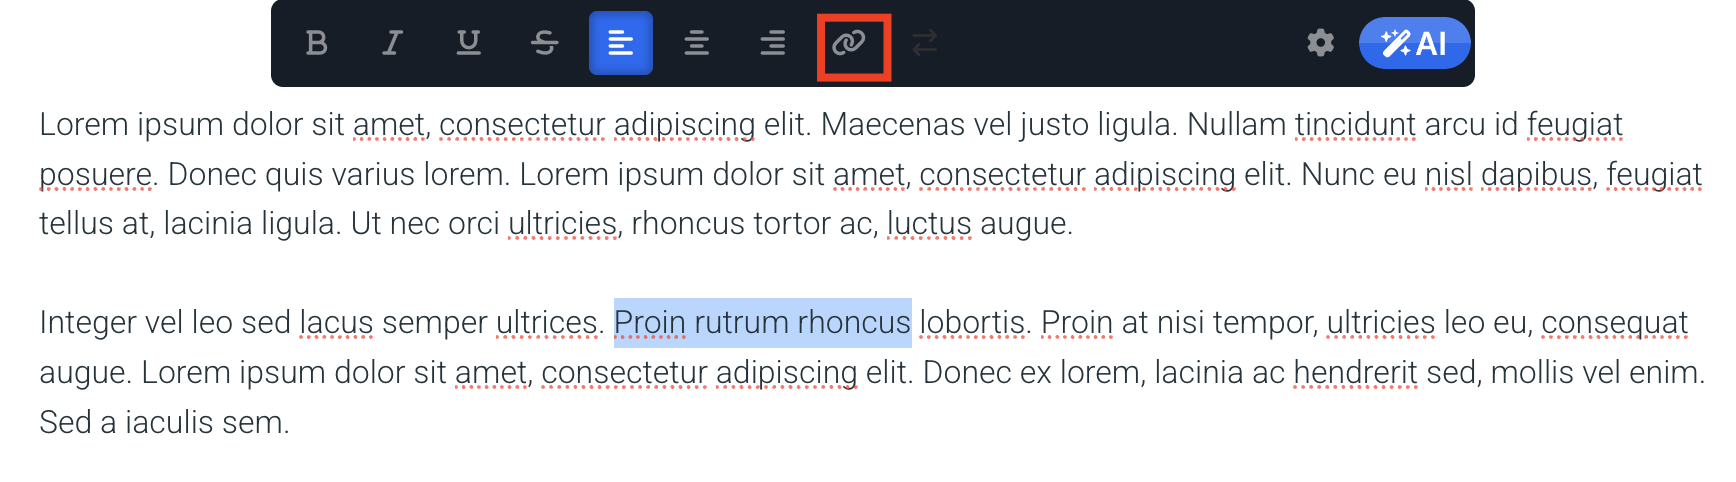
- You can also include links to external files like Google Docs or PDFs in your lesson. To do this, highlight the text you want to turn into a link, click the link icon, paste your URL, and select whether it should open in a new tab.
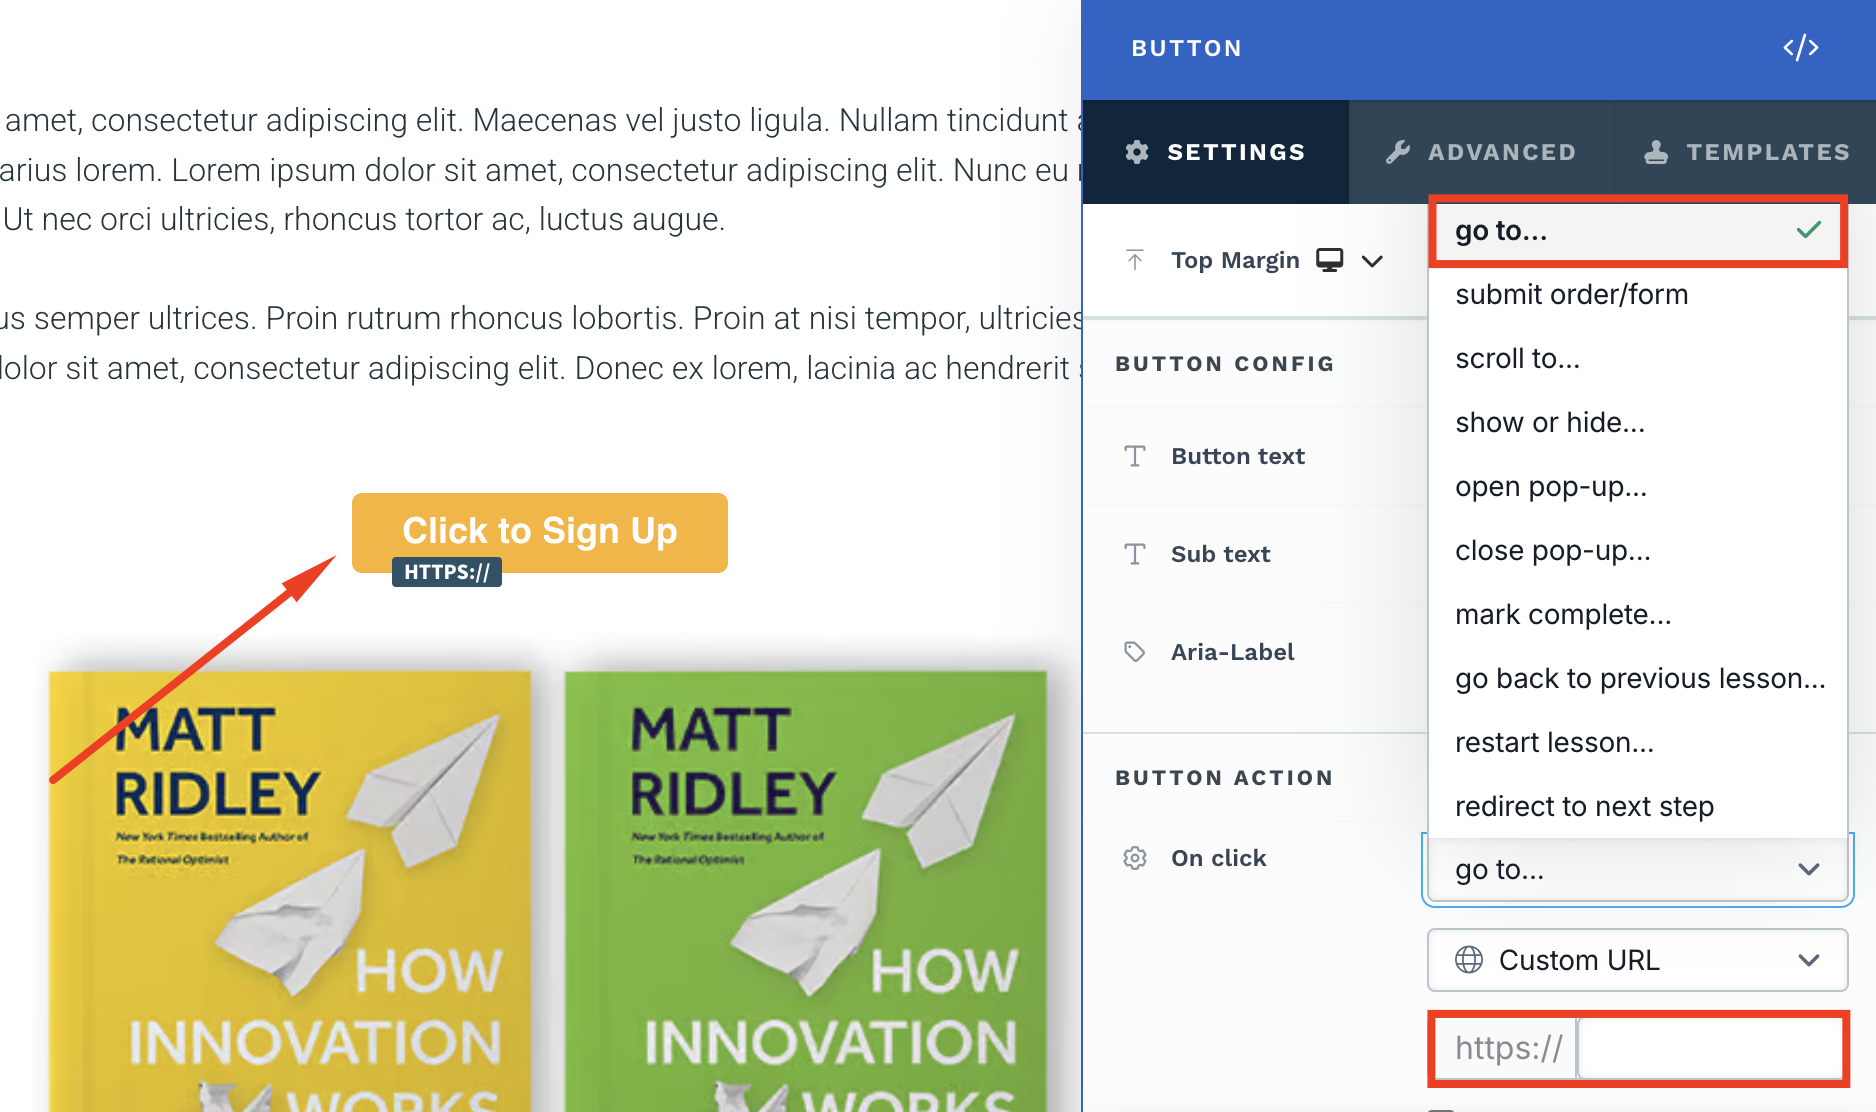
Alternatively, you can add a button to the lesson, set its action to Go to, and paste the link to your file there.
- Once your content is ready, save your changes and preview the lesson to make sure everything looks correct.
- Add content to other sections in you membership area in Clickfunnels.
Step 6: Publish your membership area content
Before the content of your membership area in Clickfunnels is visible to users, you’ll need to publish it. You can publish modules and lessons separately or keep the in Draft if you're still working on the content.
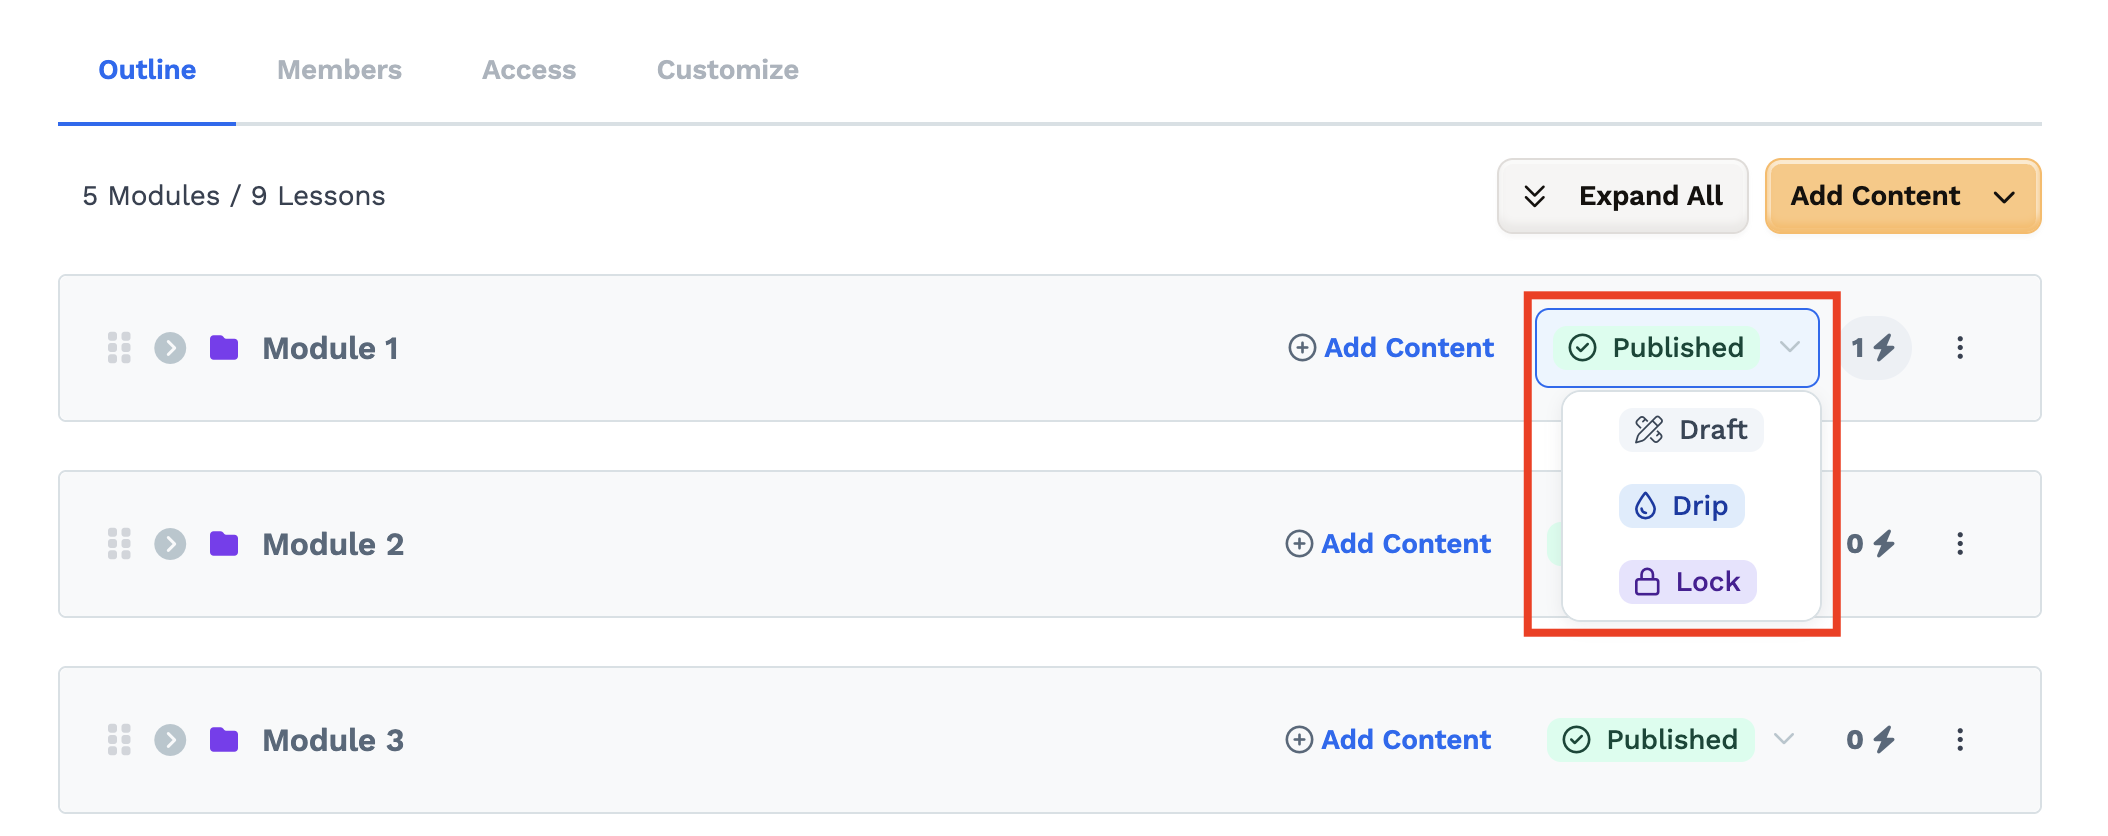
The modules have a few publishing options.
- If you want to publish the module instantly or schedule it for a specific date and time in the future, select Publish.
- If you want the module to be released over time, use the Drip option. It'll give you a possibility to specify how many days after enrollment each module should be unlocked.
- Use the Lock option for a module if you want students to complete a specific lesson before gaining access to this module. This is especially useful if you want to guide users through your content in a specific order.
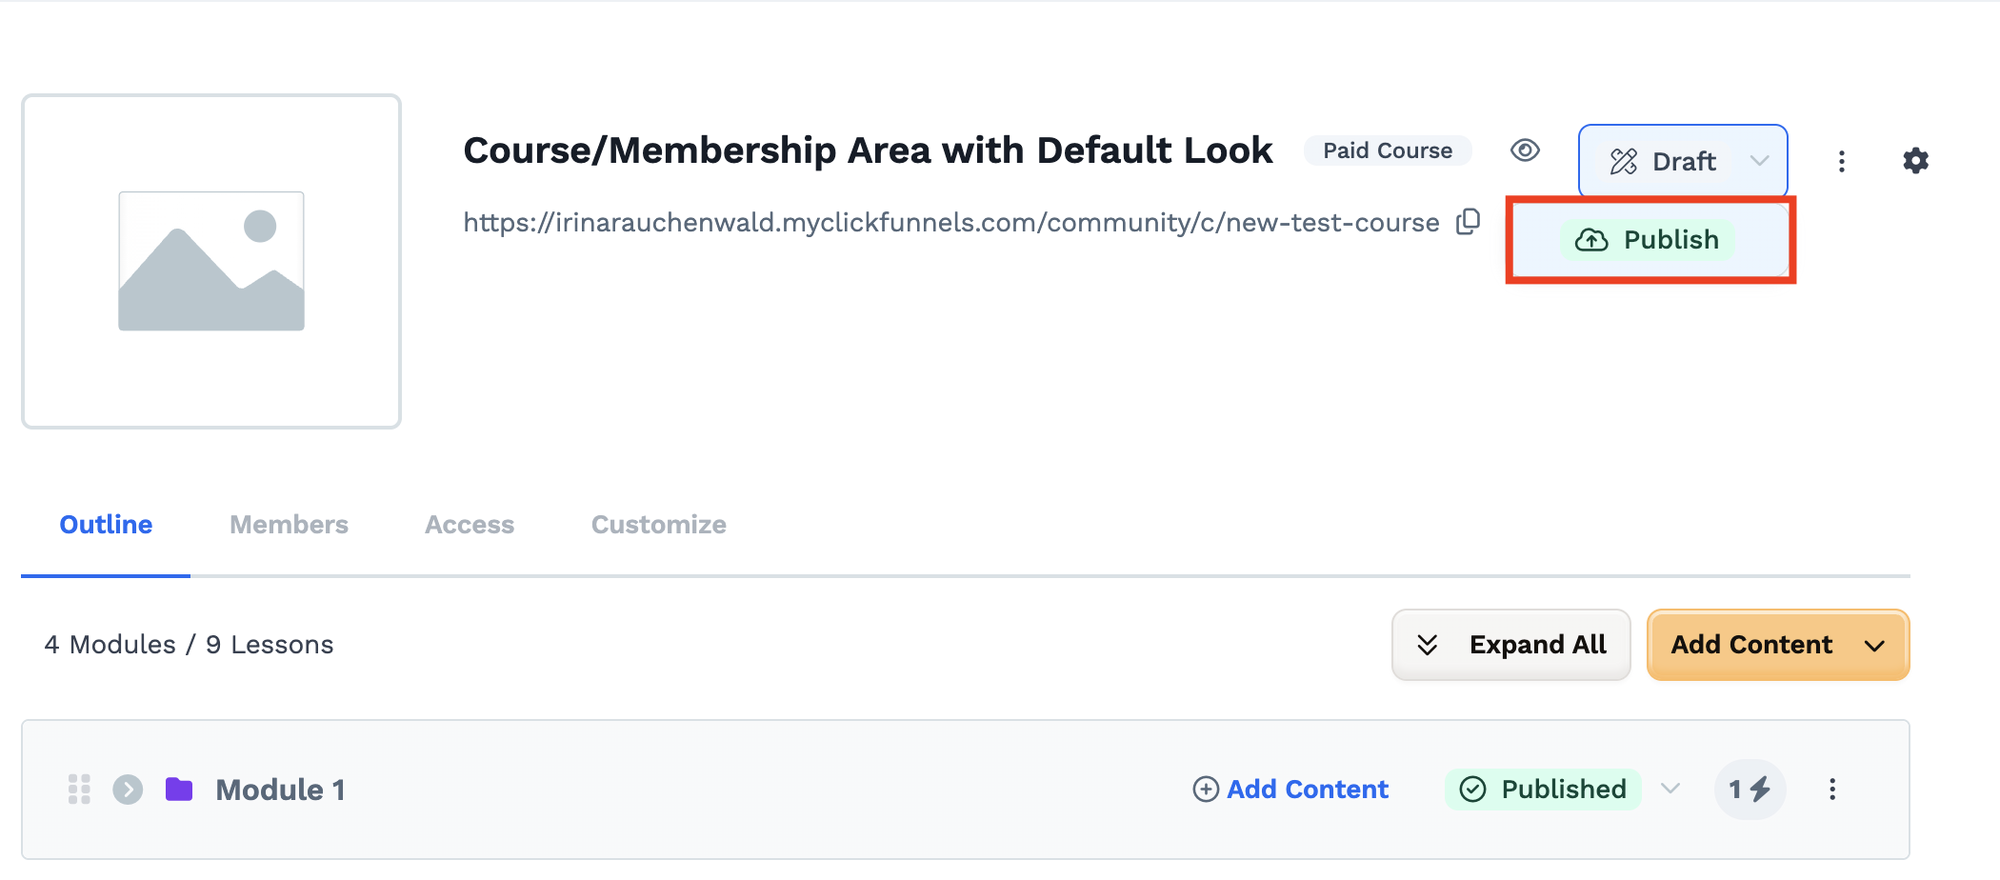
Last but not least, you need to publish your membership area. You can do it from the status dropdown in the header of the membership area or from the settings.
Step 7: Set up access rules to your membership area in Clickfunenels
Free membership area
If your membership site in Clickfunnels is free, you can simply copy the link from the dashboard and share it with your audience.
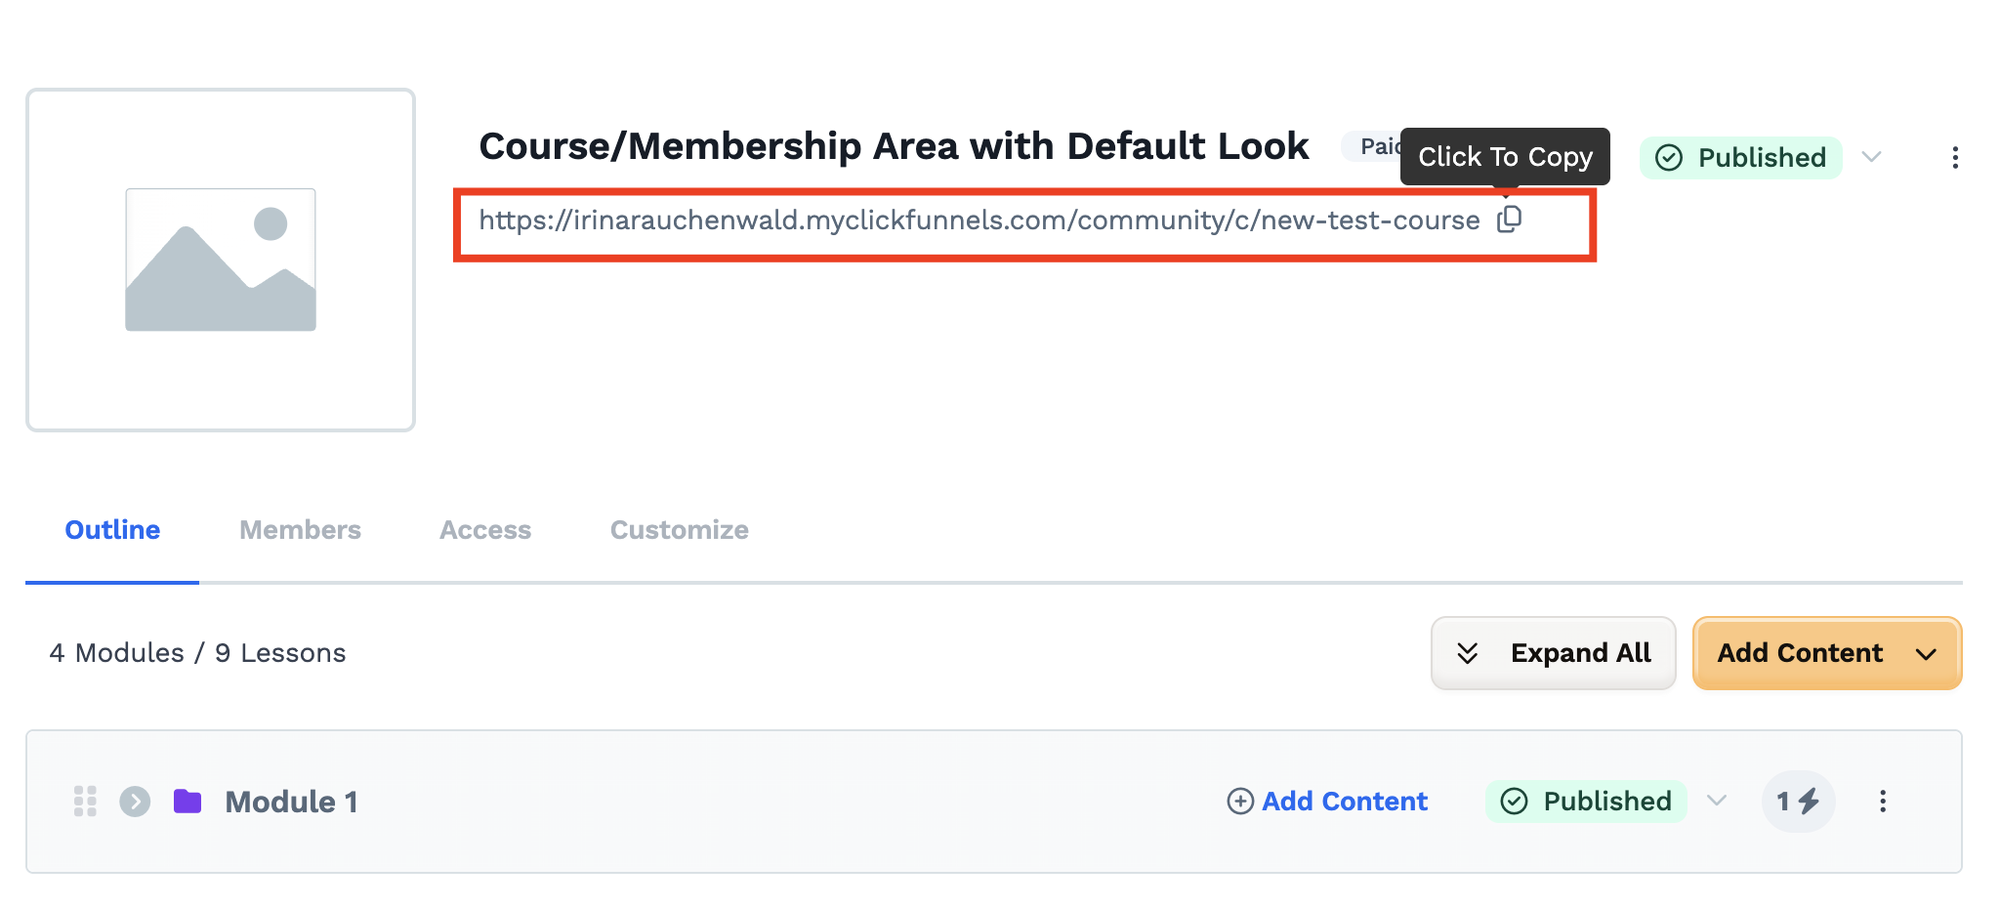
By clicking on this link, you customers will be able to create an account for your customer center in Clickfunnels and access the membership area content there.

Paid membership area
If you want to sell access to your membership site, there are a few additional steps to complete.
- First, we need to connect a product to your membership area. To do that, navigate to the Access tab in your course dashboard. Then you can either connect an existing product by clicking Select Product or create a new one - click Create Product in this case.
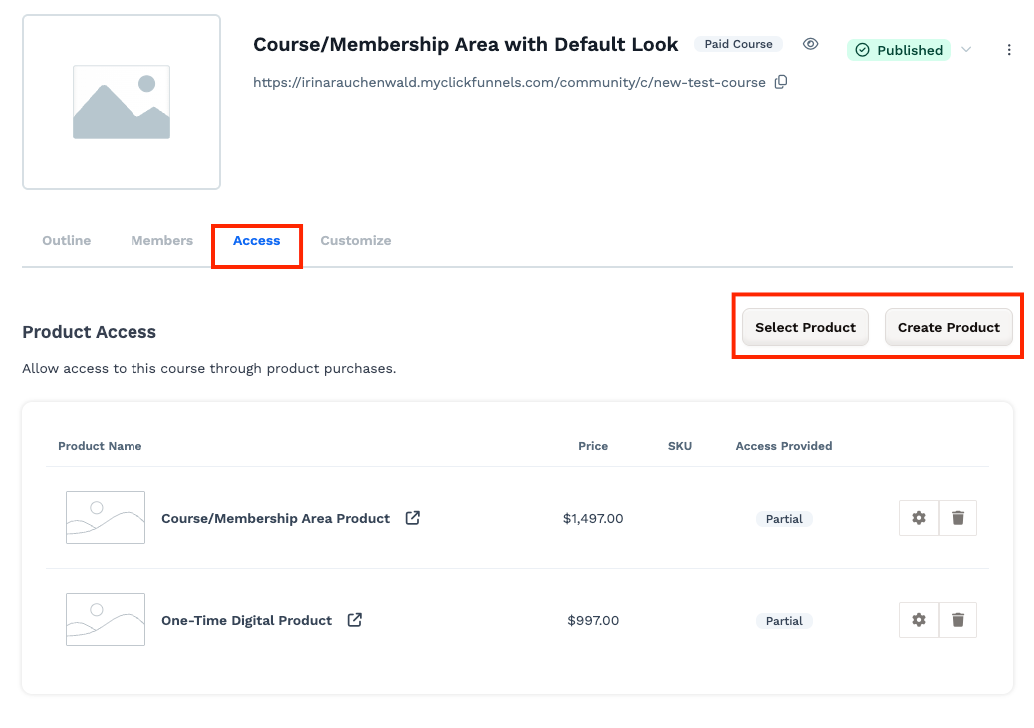
If you're not sure how to create a products in Clickfunnels, this step-by-step tutorial will guide you through the whole process.
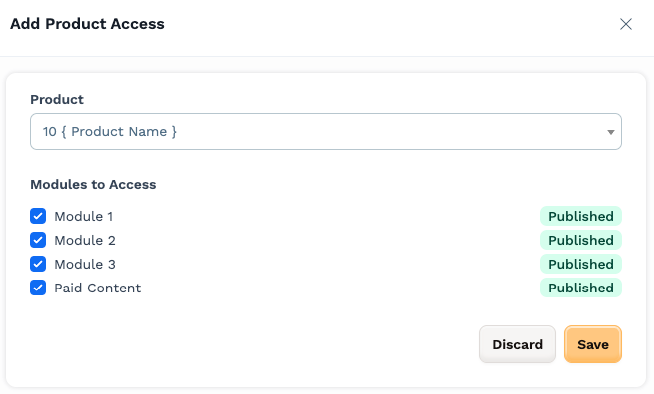
- When you're adding an existing product, select it from the dropdown and define to which modules this product will unlock access. Click Save.
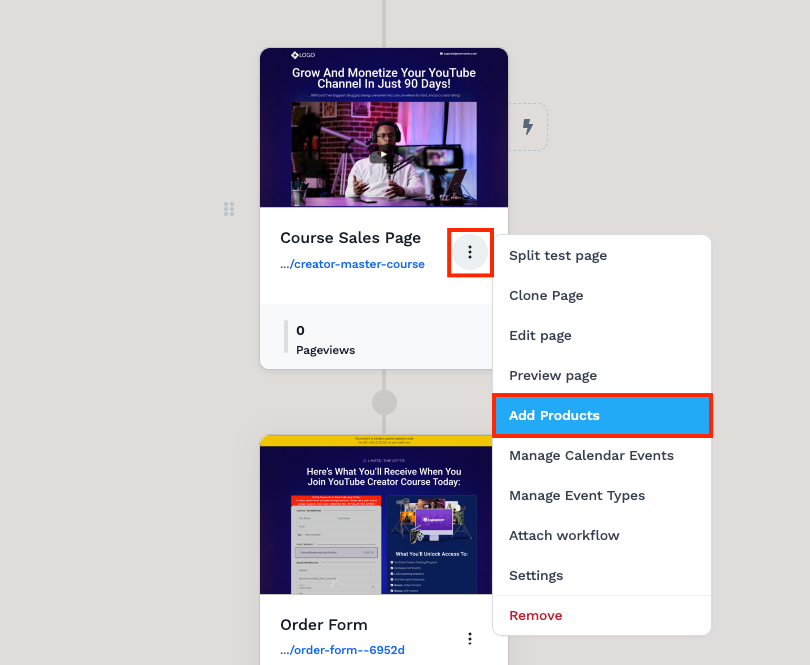
- Go to the funnel page where you're selling access to your membership area. Click the icon with three dots and select Add Products.
4. Click Add product and select the same product you attached to your membership area.
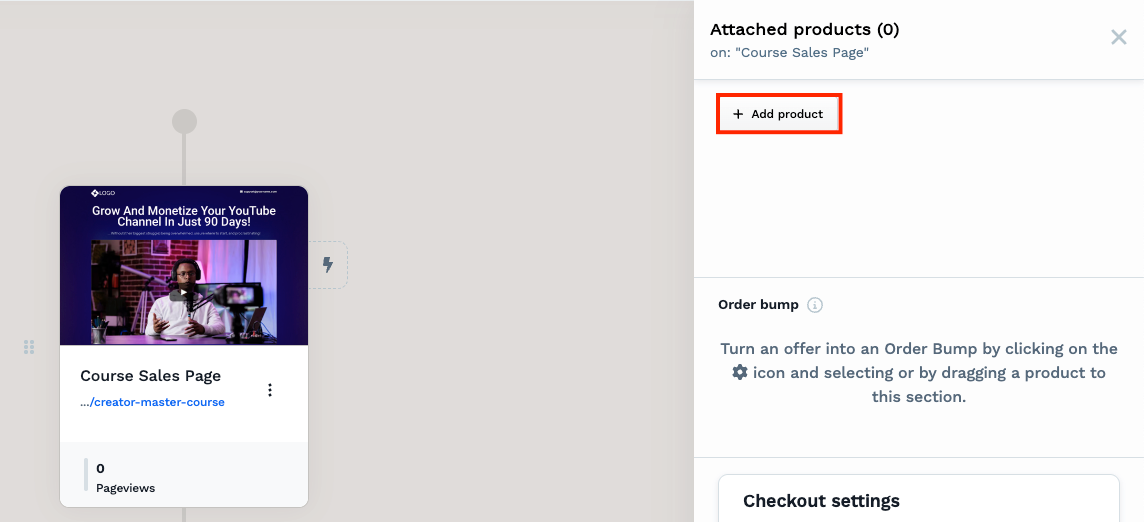
Now, when someone purchases this product on this funnel page, they’ll automatically get access to your membership area. If they request a refund, their access will be revoked automatically.
Step 8: Give access to your membership area
There are multiple ways how you can unlock access to your membership area in Clickfunnels. You can select the one that fits your flow best and set it up following the steps below.
Product purchase
If you have a paid membership area, your customers will get access to it once they purchase a specific product. See Step #7 to learn how to connect a product to your membership site.
Unlock access manually
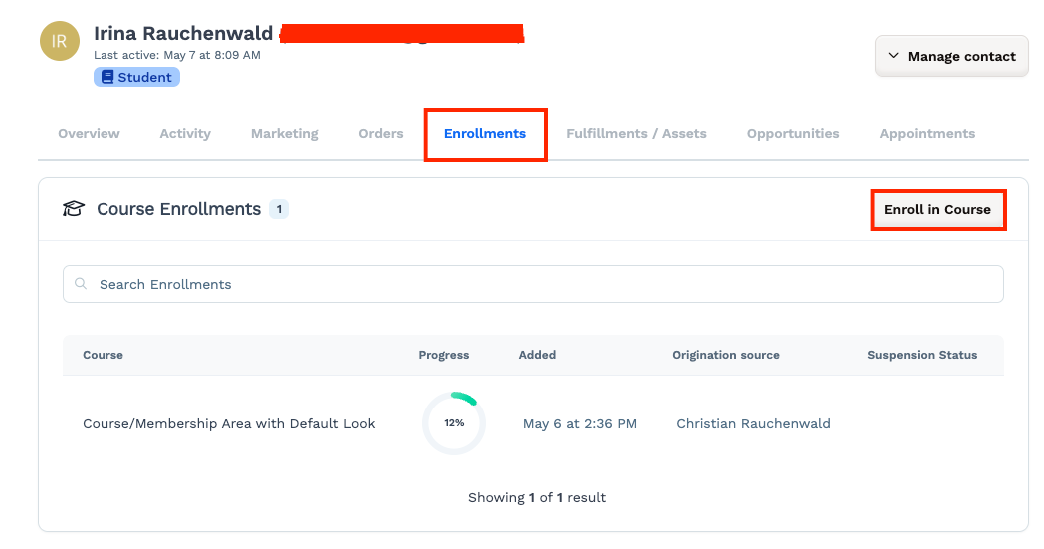
- If you want to unlock access to your membership area for a specific contact manually, go to Customers > Contacts, and find the contact for which you want to unlock access.
- Click on the name of the contact to open the details page. Then go to the Enrollments tab.
- Click Enroll in Course and select the membership area and modules you want to unlock for this contact. Click Save.
Workflow
You can also unlock access to your membership area in Clickfunnels automatically using a workflow. For example, if a contact opts in on your funnel page (or completes any other action you can use as a trigger), you can create a workflow that will unlock access to the membership area for them automatically.
- Go to Automations > Workflows and click Add Workflow. Give it a name and click Create Worklow.
- In the workflow, add a necessary trigger (e.g., an opt-in) and an Enroll step with your membership selected.
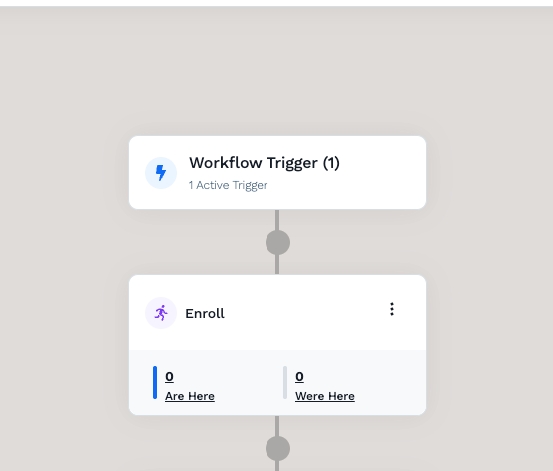
- Enable the workflow using the toggle in the top right corner.
Step 9: Customize the enrollment email
Whenever someone gets access to your membership area, Clickfunnels will send them an enrollment email. This email contains a link to the signup page where they can create their account and access your content.
- If you want too edit this email, go to Workspace Settings > System Emails, and switch to the Courses tab.
- Find the enrollment email template and click on it. Click the Edit custom template button.
- You can customize the text and look of the to email, but make sure to keep the dynamic elements and the link attached to the button unchanged as they are updated by Clickfunnels automatically.
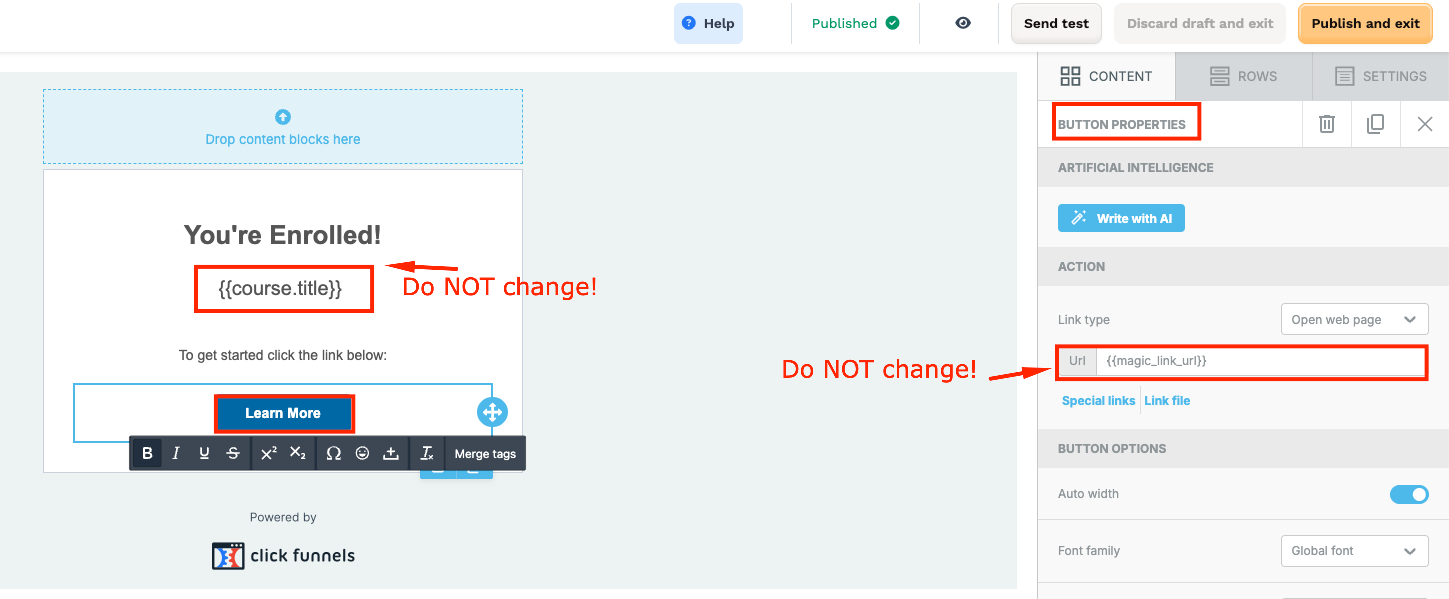
- Once you finalize your enrollment email, click Publish and exit to save the changes.
You now know how to create a membership area in Clickfunnels, structure your content, and manage access to it.
Don't forget, if you want to save time and effort, you can grab our done-for-you membership area framework here instead of building everything yourself!
It’s free when you create your Clickfunnels account using our special link, which also gives you an extended 30-day Clickfunnels trial instead of the usual 14 days, – and it comes with everything you need: a pre-built membership area, a sales funnel if you want to charge for access, a product setup, and a full tutorial to guide you through it.
Now it’s your turn to build a membership area your audience will love.
If you’ve found this content helpful and would like to support the blog, consider subscribing by clicking here. Your support is greatly appreciated!